For this guide we are going to step through the basics of the build process, but there are many options that companies can choose when setting up and managing a production build within Aligni.
For more information on the ways a build can be built or modified, please refer to the documentation page for builds.
Create the build
Step 1
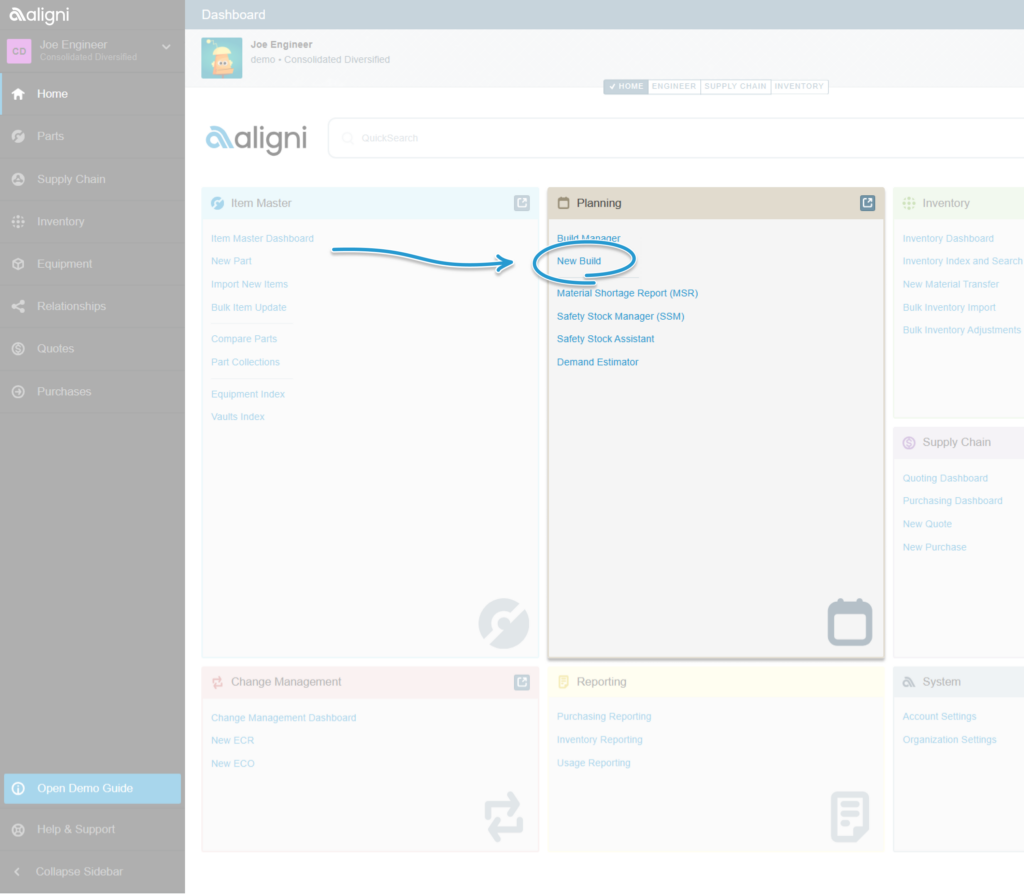
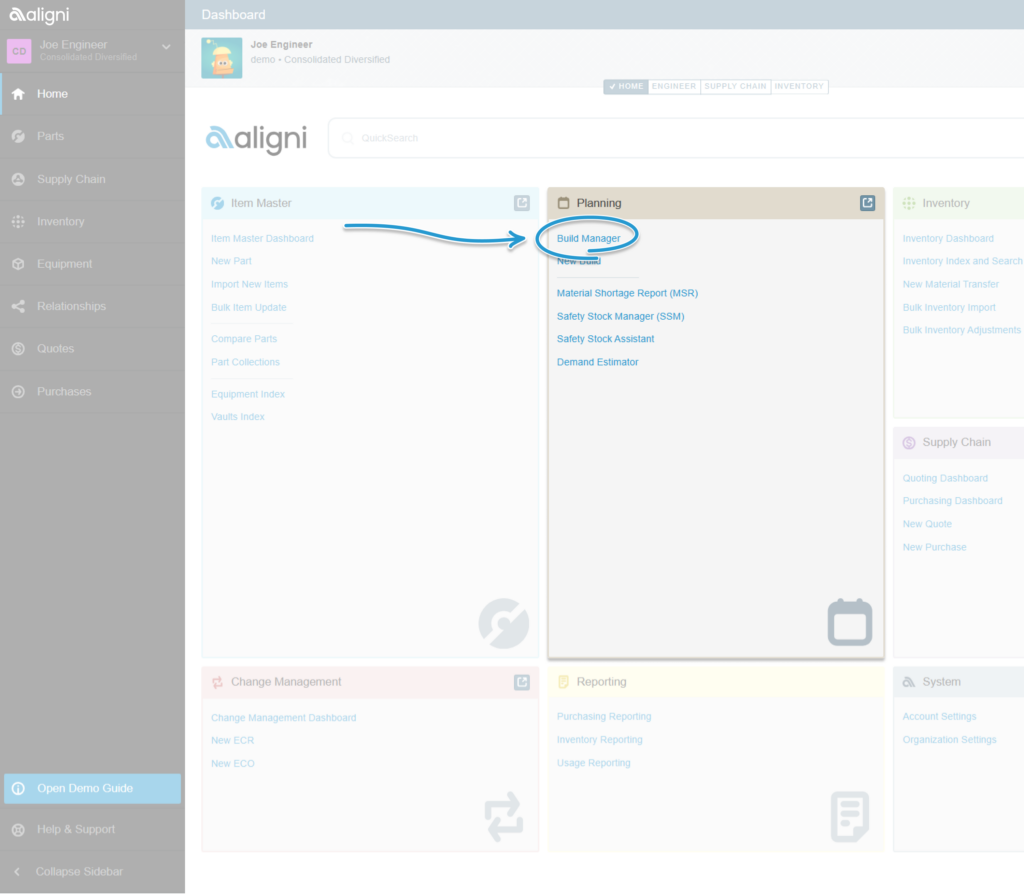
On the Home dashboard, navigate to the Planning section in the upper middle of the screen.
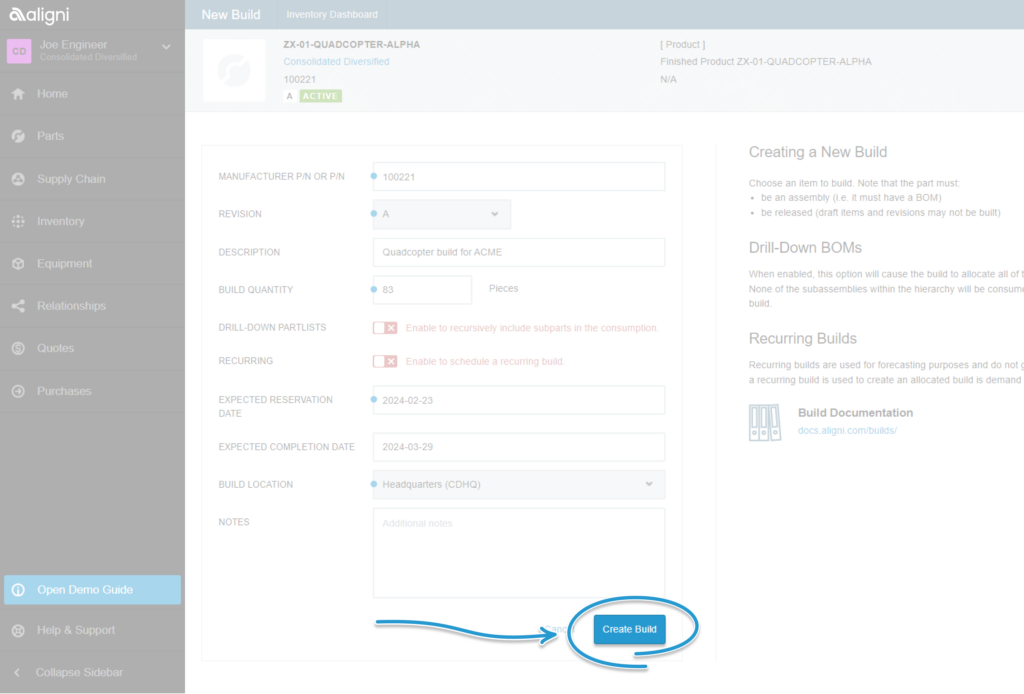
Click on the ‘New Build’ link in the section. This opens the New Build screen.
Step 2
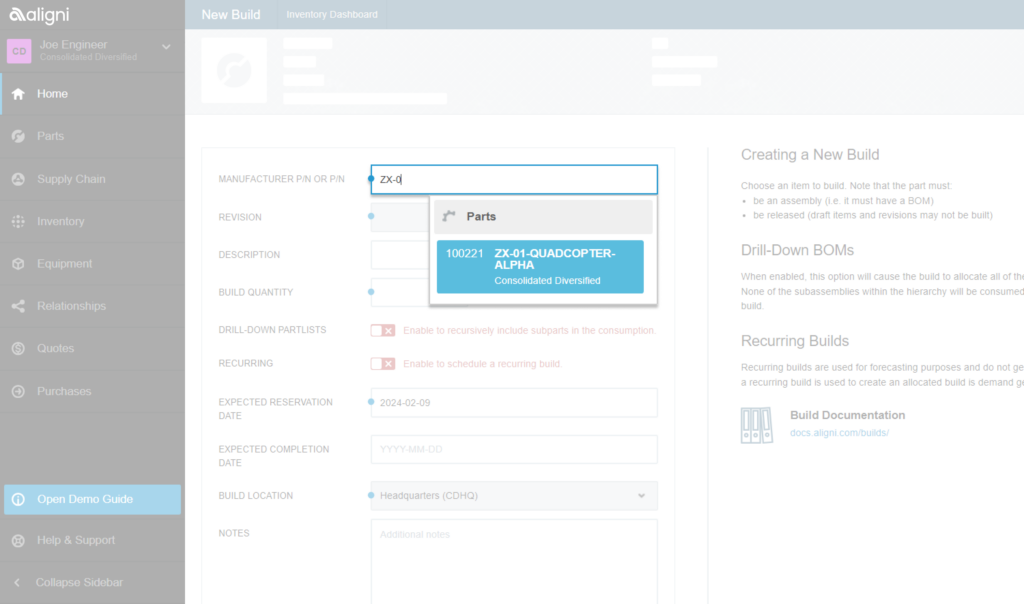
In the ‘Manufacturer P/N or P/N’ field of the New Build screen, type in the product’s part number. For this exercise, we’ll be using the ZX-01-QUADCOPTER-ALPHA product.
Tip: Aligni offers part suggestions as numbers or characters are typed in the form fields to quickly locate parts.
Tip: Aligni will default to the Manufacturer part number (100221) rather than the Part Number (ZX-01-QUADCOPTER-ALPHA) in the form field, once a product has been selected.
Tip: In Aligni, parts, products, assemblies and subassemblies are all considered ‘parts’
Step 3
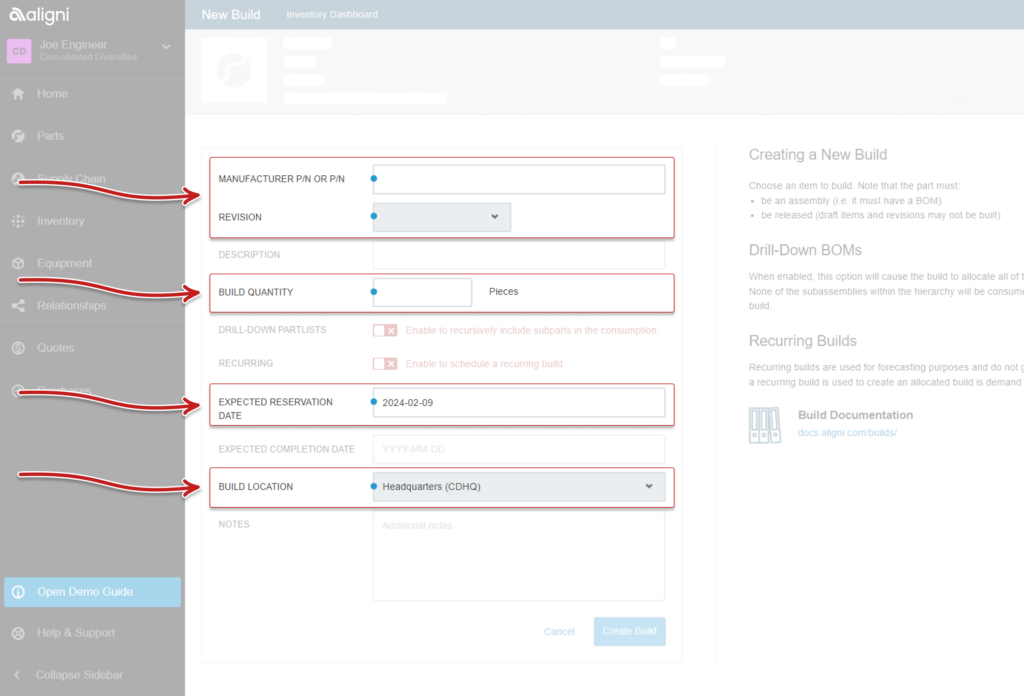
Fill out the rest of the fields as thoroughly as possible. The only additional field required at this point is the quantity. For this example, let’s build 10 units.
Tip: The fields with the blue dot at the beginning are required. These have to be filled out in order for the system to accept the new part.
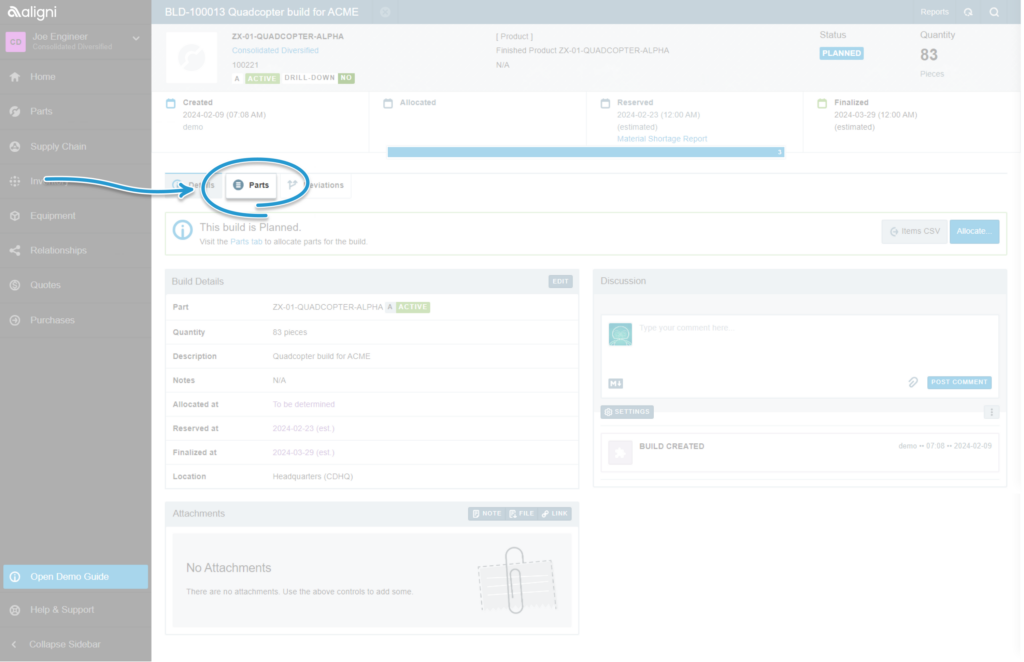
After the ‘Create Build’ button has been clicked, Aligni creates the build in a planned state. This state has not committed any resources (i.e. inventory) to the build. In the planned state, there is also no demand for the components on the build.
The next step is to allocate parts to the build.
Allocating the build will create demand for the components required and it is this demand that is then actionable by your procurement team to acquire the components required to complete the build.
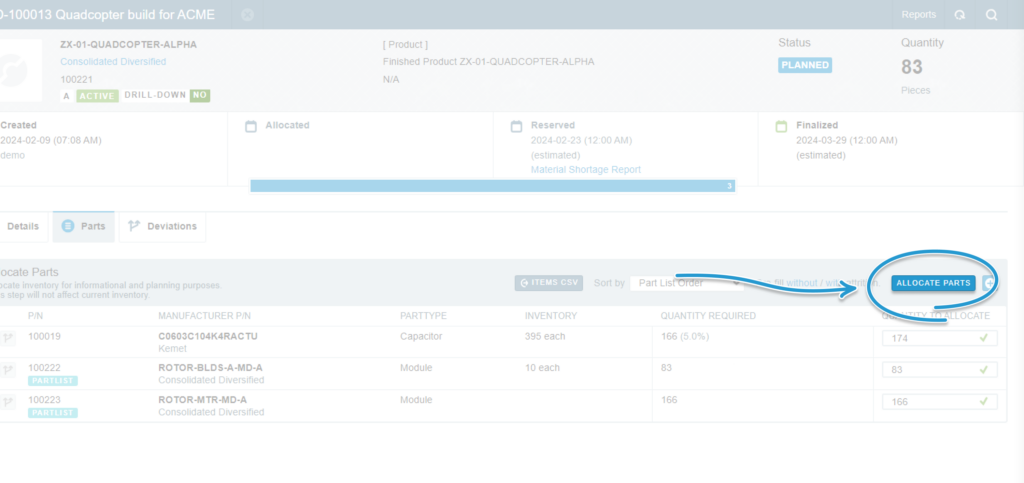
This tab shows all the parts and materials listed for the production job. The list is built from the product’s bill of materials list. Aligni takes the product’s part list and applies the build quantity to it to arrive at the total part demand for the build.
For this product build, the ‘Parts’ tab shows three potential conditions for parts in the system. The organization has enough parts in inventory for the first part in the list. The second part in the list only has a partial amount of parts available in inventory for the build. The third part has no inventory on hand for the build.
Tip: Builds can allocate parts even if the parts are not completely in inventory.
Step 2
Click the ‘Allocate parts’ button at the right of the ‘Parts’ tab.
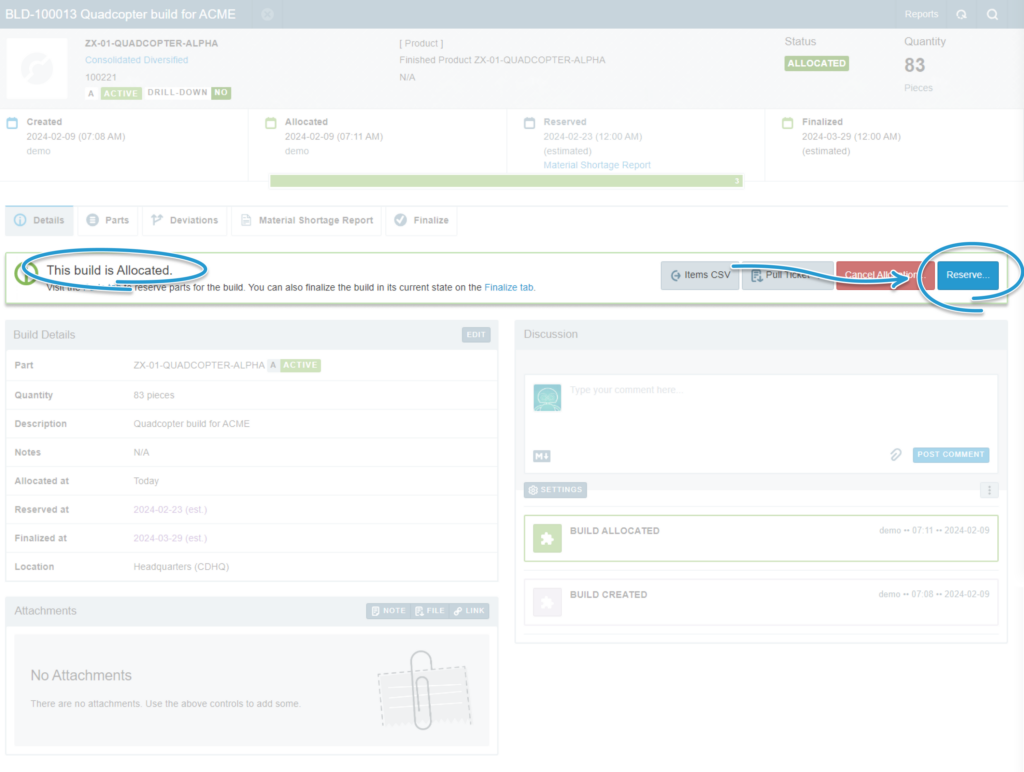
Aligni will then display a green status bar under the ‘Allocated’ and ‘Reserved’ build stages on the build screen.
Allocating parts informs quoting and purchasing operations that there will be an upcoming demand for the parts that make up the build.
Tip: Allocation does not reserve the parts, though. The parts available will be available to other builds until the build is reserved.
Reserve the build
When parts are reserved for a build, they are committed to their use for that build alone. They cannot be used for any other build after being reserved. These parts will have their quantities de-incremented by the amount needed for the build. On-hand quantities going forward will reflect this reservation.
Note: Aligni supports the concept of “partial reservation”. That is, you can reserve some items on a build without reserving all of the items. This can be useful if you want to “protect” these items from being consumed by some other process.
Step 1
Pressing the blue ‘Reserve…’ button at the right of the screen above the Discussion section puts the parts in the build into the reserved state.
Step 2
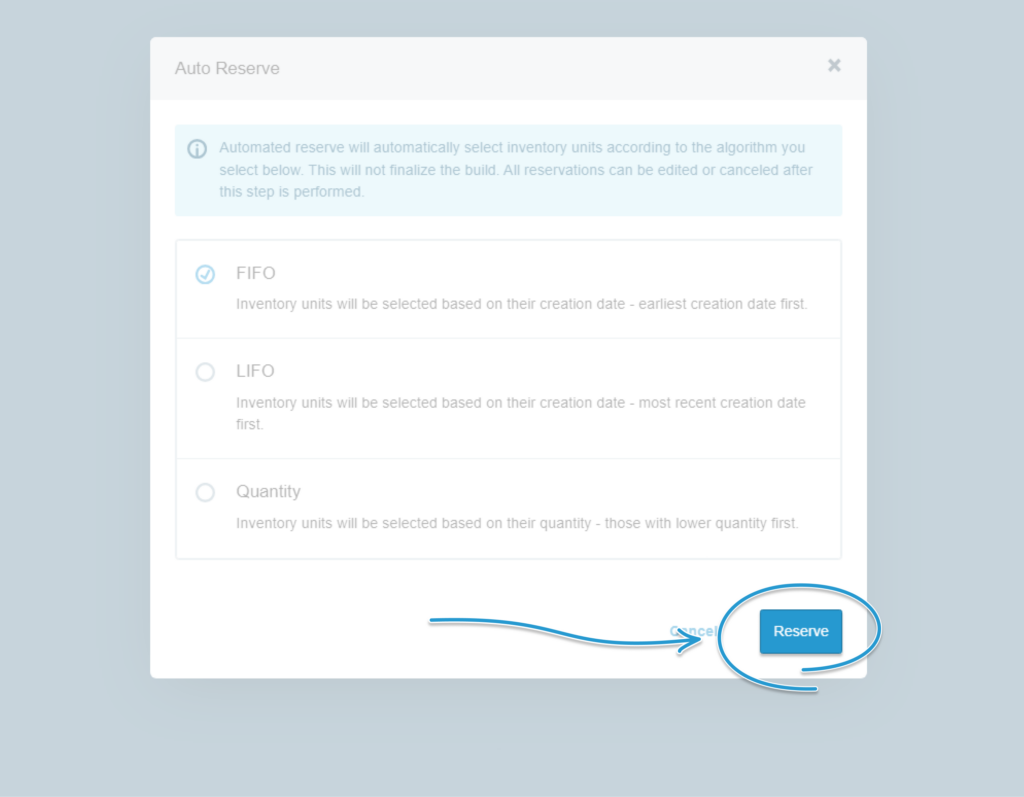
After the ‘Reserve…’ button is pressed, Aligni will bring up the Auto Reserve form. This provides the ability to select the method of inventory use, if companies have multiple inventory consumption methods available.
After selecting the inventory consumption method, click the ‘Reserve’ button.
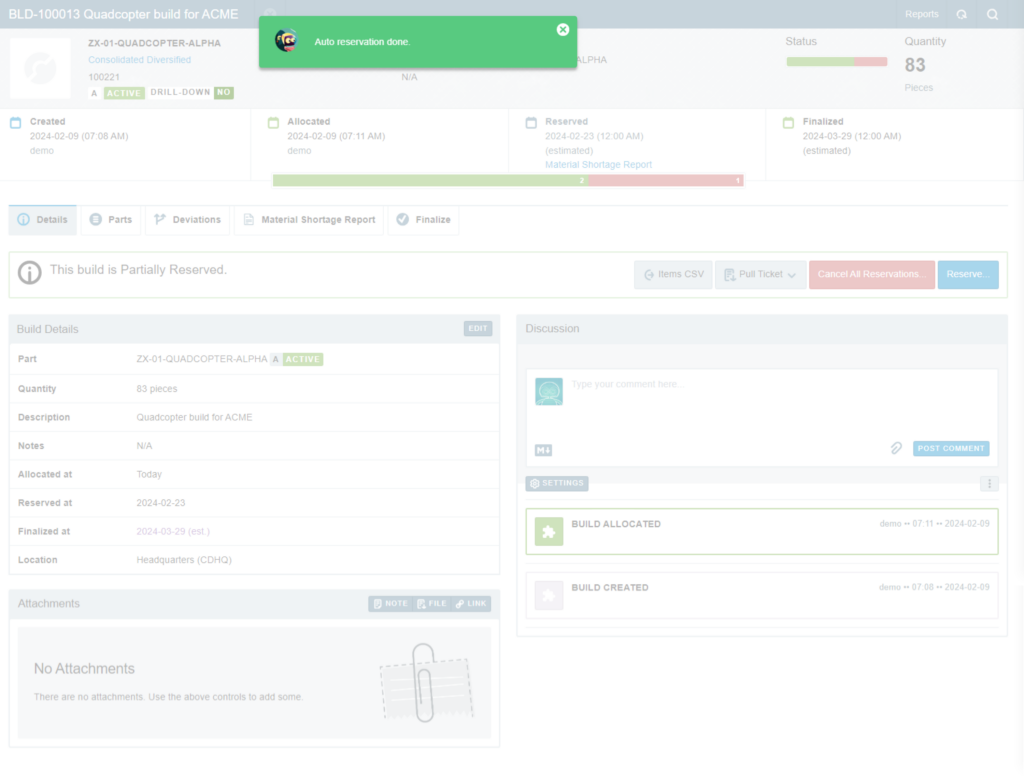
Aligni will return the user to the build screen and indicate the parts reservation is done.
For our build, the status bar below the ‘Reserved’ build stage is partially red. This warning indicates that while the parts have been reserved, there is a shortfall of on hand inventory to complete the build. Until inventory levels are increased to cover the build, this will stay in its warning state.
Further, Aligni also signals that the build is partially reserved just below the status bar.
Checking Part Status
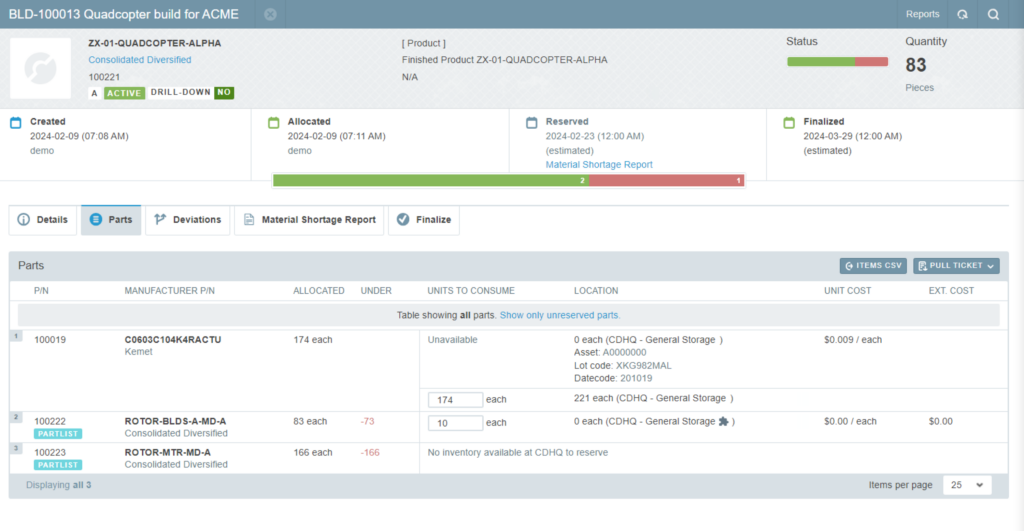
Clicking on the Parts tab brings up the parts needed for the product’s build. Here, in the second and third rows, the negative numbers further reinforce the shortfall that needs to be addressed before the build can proceed.
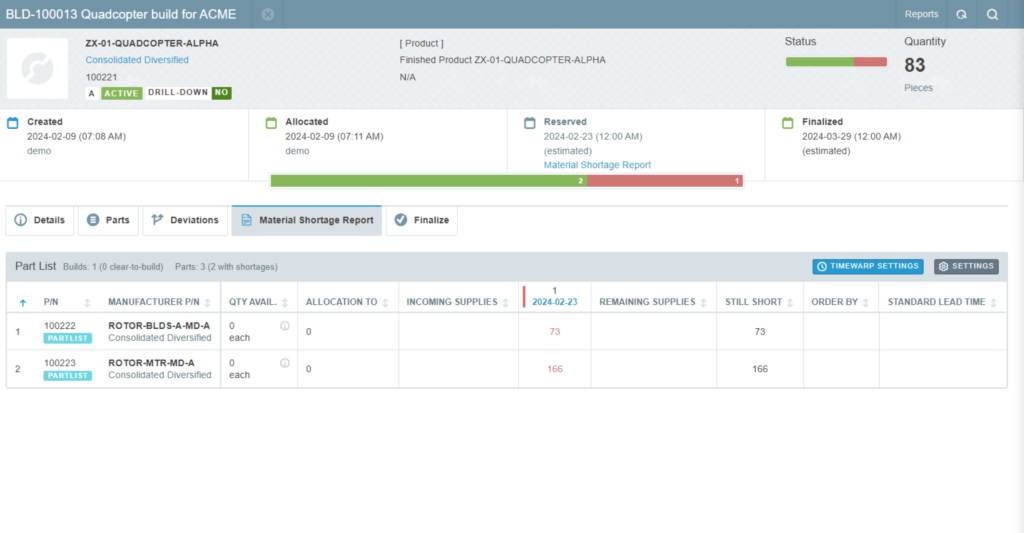
For a more concise view, click on the Materials Shortage Report tab to the right of the Parts tab.
This tab shows precisely which parts require more inventory and by how much, as well as other information about ordering the part.
Finding your Build
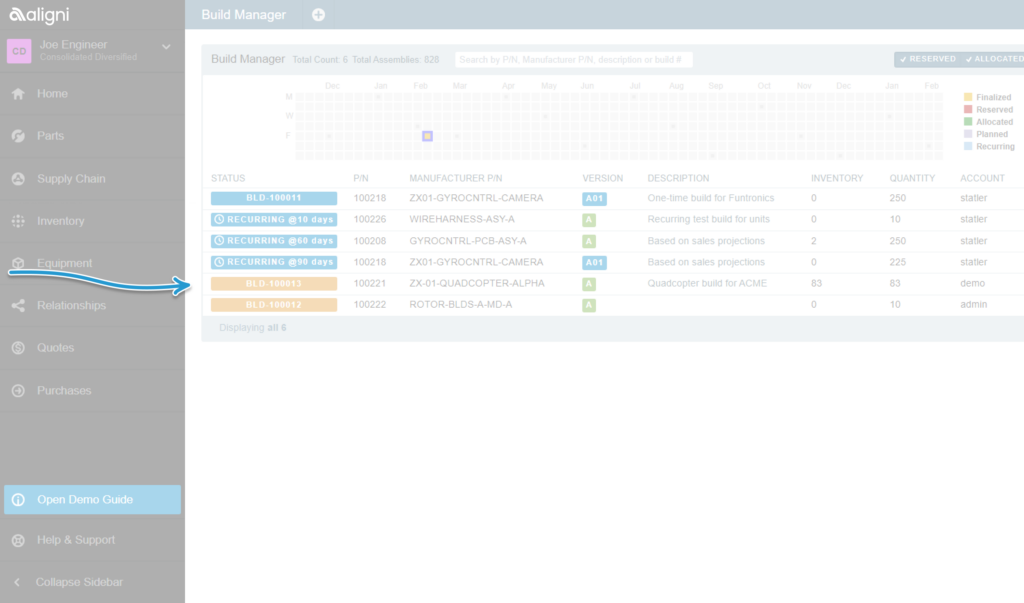
To find the newly created build, go to Aligni’s Home screen. Under the Planning section, click on the ‘Build Manager’ link. This will open Aligni’s build manager screen.
Tip: The Build Manager screen shows all current, in-progress builds in the company’s system.
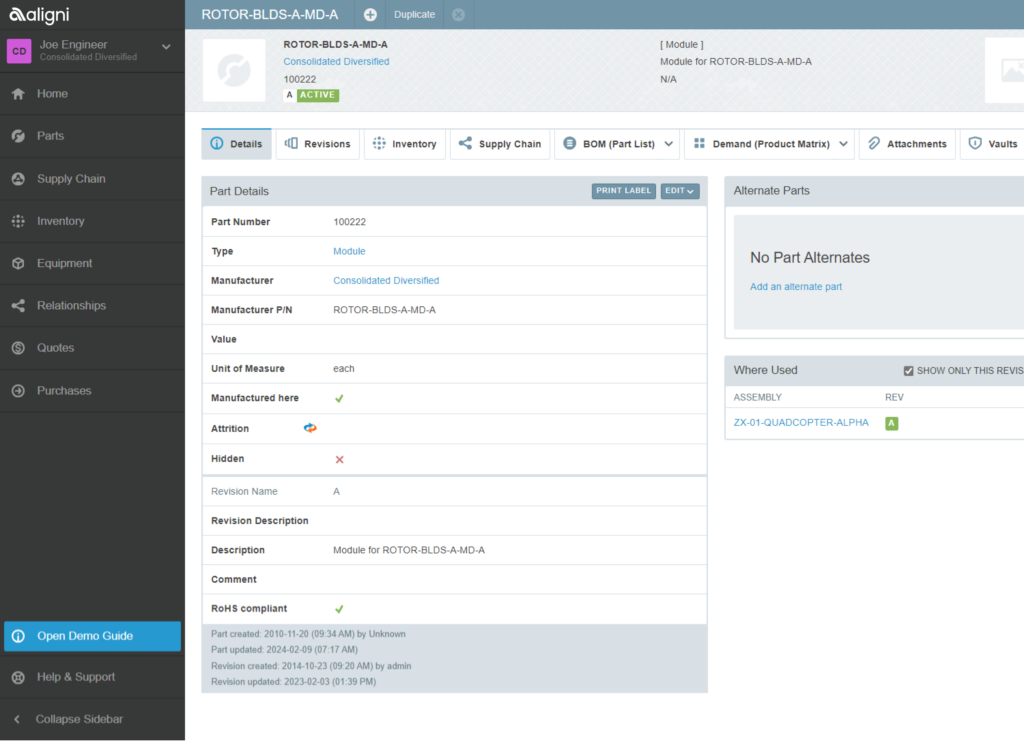
Scroll down to the fifth entry in the list to find the newly created build.
To view the build, click on the row and this will open the build’s build screen.
Finalizing the build
The last stage of the build’s life cycle is when it gets finalized. This is the stage where the build’s products have completed manufacturing and the parts that go into the products have all been taken out of the company’s inventory and used in the production of the products. In this process, the produced products are added into the company’s inventory as finished goods.
Step 1
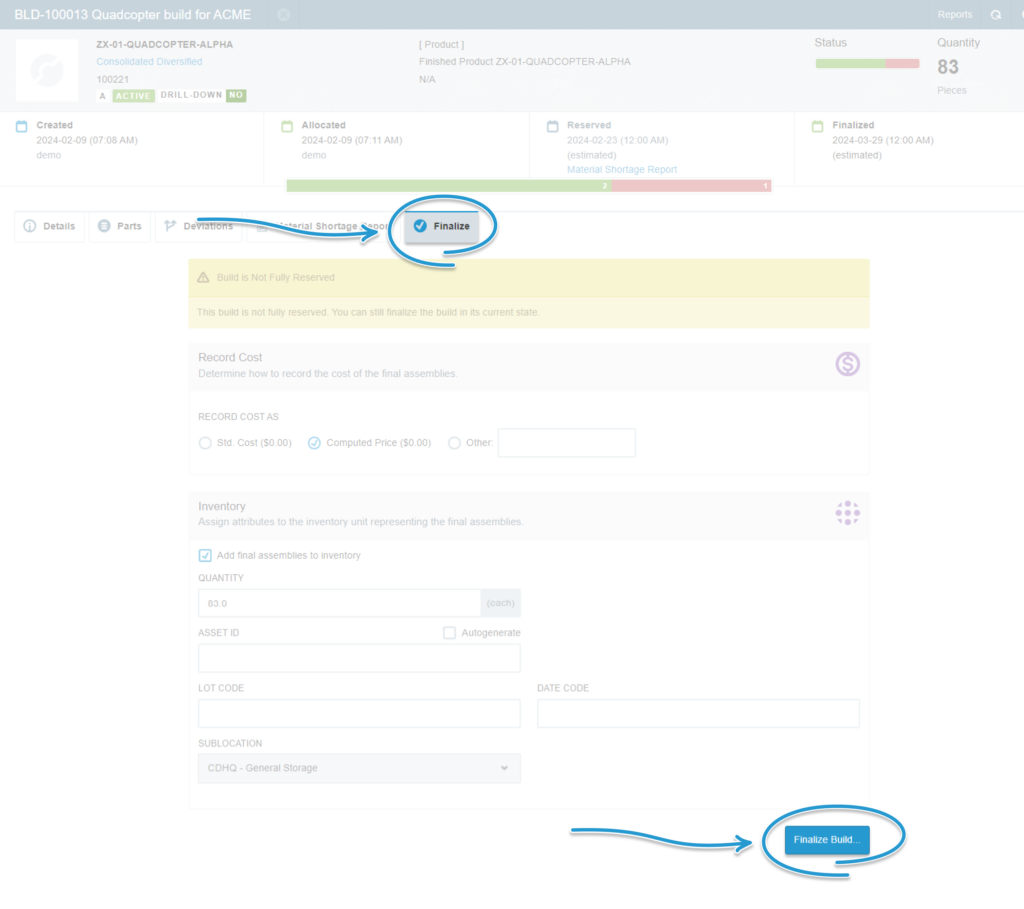
To start the process, click on the ‘Finalize’ tab on the build screen. This will display the Finalize build form.
Note: While our build still suffers from a shortage of parts, we can still finish the build process.
Fill in the quantity of finished products to return to inventory in the Quantity field of the Inventory section of the form. This will adjust the quantity of products in the company’s inventory to reflect the newly built items.
Then click the Finalize Build button.
Step 2
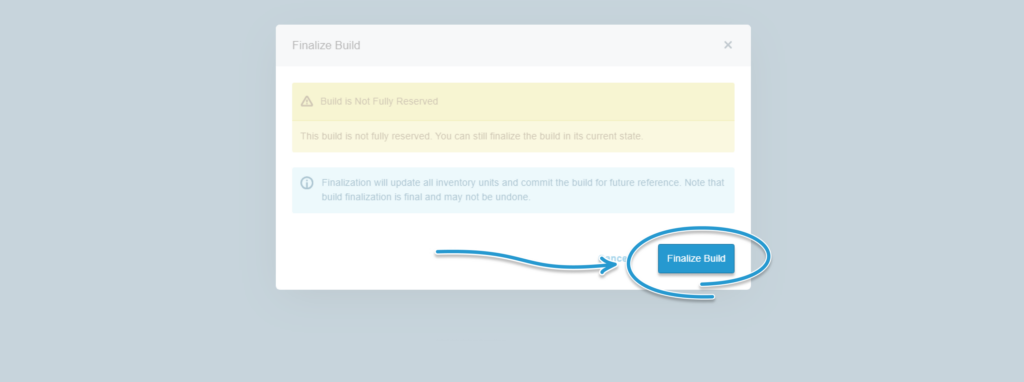
For our build, this will open the ‘Finalize Build’ screen. Once again, Aligni will remind us of the incomplete nature of the build. It will also provide the ability to go back to work on the build instead of moving forward.
For this guide, we will go forward with finalizing the build to explain the basics of the process.
Click the Finalize Build button.
Finish!
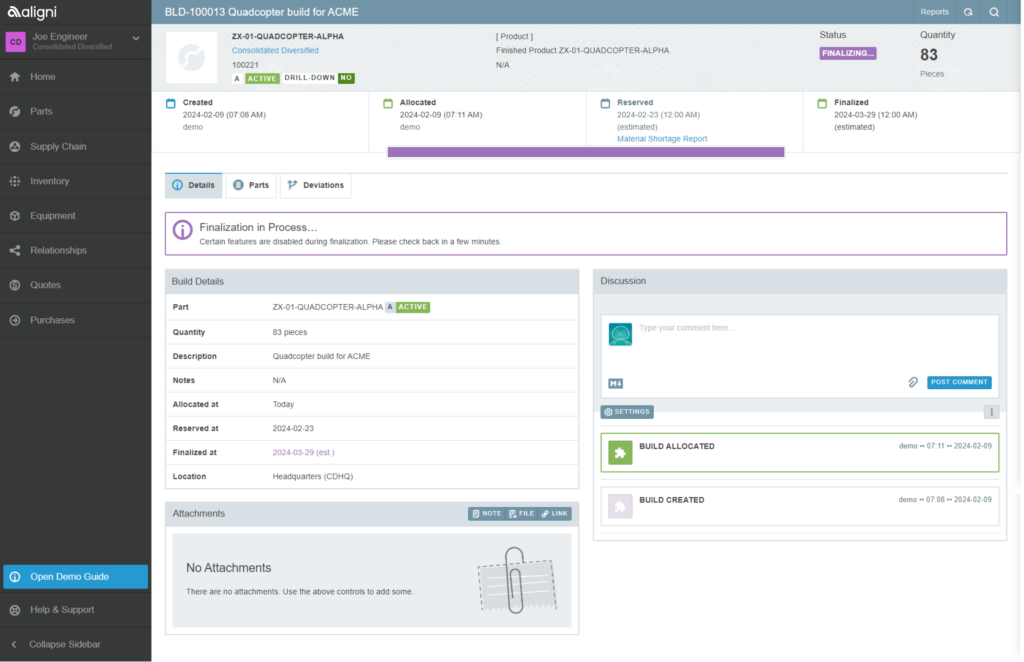
Aligni will then take us back to the build screen. The build will take a few moments to finalize the build within the system.
This completes the life cycle of the build!
Learn more about Bills of Materials in the Aligni system
Mastering the Aligni Item Master Database
Other Pages in Quick Start Guide: Create a production build
- Basics
- Bespoke Support
- Engineering Change Management
- Free Aligni for Open-Source Hardware Projects
- FusePLM Migration
- GraphQL API
- Parts & Vendors Conversion
- Privacy Policy
- Quality Control
- Quick Start Guide: Create a Bill of Materials
- Quick Start Guide: Create a new part
- Quick Start Guide: Create a new vendor
- Quick Start Guide: Create a production build
- Quick Start Guide: Create a Request for Quote (RFQ)
- Spreadsheets Migration
- Vendor
- Parts
- Guides
- API
- ActiveQuote
- Support

