Setup

To start an inventory transfer, navigate to the Inventory Dashboard by clicking the Inventory link on the main navigation menu. From the Inventory Dashboard, click on the New Transfer link. This will take you to the New Inventory Transfer page where you specify the source and destination locations of the transfer. The source location determines which inventory units will be available to add to the transfer. Only one source location may be specified per transfer.
Click on the “Create New Transfer” link to setup the transfer. This will automatically select the new transfer as the active Part Cart target so you can begin loading parts.
Add Items with the Part Cart
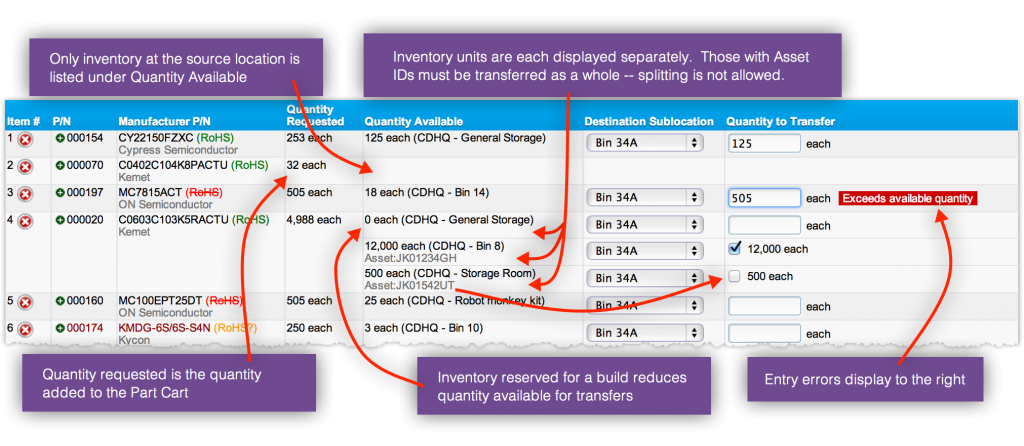
As the active Part Cart, all parts added through the Part Cart will be added to the transfer. You may now browse your database and add parts as required. On part pages where a quantity is specified for the “Add to Part Cart” function, this quantity sets the transfer item’s quantity requested value. The quantity requested is a reference quantity only and does not affect the transfer process in any way.
Quantity requested is helpful when kitting for a contract manufacturer. For example, you may need to transfer a kit for 100 pieces of a particular assembly. You would visit the assembly’s Kit List Page and enter a target quantity of “100”, then click on the “Add Items on Page” link in the Part Cart to add the entire contents of the kit list to the transfer. The quantity requested for each line item will be the quantity required for the kit.
Specify Item Quantities
When viewing a pending Inventory Transfer, each part is listed with the quantities available at each sublocation at the source. You may enter any value up to the quantity available at that location. If you enter less than the full amount available, the inventory unit will be “split” so that only the quantity you have entered will transfer. For each inventory unit, you may also enter the final destination sublocation.

Committing the Transfer
Once the proper quantities have been entered, you will typically prepare the shipment and get a tracking number for the transfer. Enter the tracking number before you commit the transfer.
Packing Slip

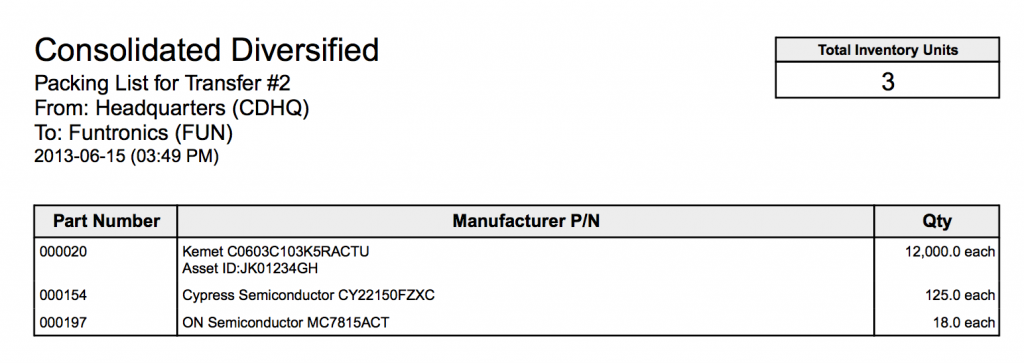
A packing slip is available as a PDF document you can print and include with the shipment.
Pull Ticket
A pull ticket is also available as PDF document. In addition to the item list, the source location is included on the pull ticket so that warehouse personnel may locate the items.
Inventory Status
When you commit the transfer, each inventory unit will be set to “In Transit”. Each “In Transit” inventory unit is then associated with this transfer and will link to the transfer from any inventory view (such as the Part Details page). Changes are not allowed on inventory in transit. Inventory units will not be relocated to the final destination until the transfer is Completed.
Completing the Transfer
Once the package has been received at its final destination, you should Complete the transfer. This moves all of the inventory units to the destination location and removes their “In Transit” note. Inventory Records are also created to indicate the transfer of each inventory unit for historical tracking. The Inventory Records will link to the Inventory Transfer.
You cannot cancel or undo a transfer after it has been completed. You may, however, cancel a transfer that has been committed.


